
Breaking in new skates can be uncomfortable, but should not be painful. The materials used in skates are stiff and need to soften to your specific foot shape. Proper fit is essential to performance and longevity of the skate and figure skating.
If your skates are heat moldable and you require additional assistance in obtaining the proper fit, your Jackson Ultima Skate Technician can assist. Your skates will be heated at a carefully controlled temperature and molded to your feet without breaking the skate down.
Do not walk on boots that do not have a blade mounted.
For the first few sessions, the skates should not be laced too tight and the top hook should be left unlaced. Some skaters find a hair elastic looped over the top hooks provides support without restricting knee bend while the foot settles properly into the boot. It may be necessary to retie your boots as the boot conforms to your foot and ankle area and as the laces stretch.
Barefoot Booties by Jackson Ultima can be used to prevent blisters caused by the breaking in process. Begin slowly and go easy on your new boots. Limit jumps and spins, gradually increasing the amount of time on the ice using your new boots.
Blades are generally mounted on your new boots or outfit so that minor adjustments can be made before permanently securing. With general stroking exercises, you should feel if your blades need to be adjusted. Once the final proper blade placement is obtained, permanent screws need to be added by your Skate Technician. Some screw holes will be left unused on the sole plate for future positioning adjustments or alternatives if original holes become enlarged through wear. Until final blade placement is completed, skates should not be used for jumps.
Loosen your laces and place your foot into the boot. The bottom half of the holes in your boot should be tightened to take up the slack. Pull the laces snugly for the remaining holes and across the instep, ensuring that the boot wraps around your foot and across the tongue sufficiently. Hold the tightness in place by knotting the lace before moving to the hooks. Wrap the laces over and then under each hook, keeping the ankle tighter and then some room at the top to allow sufficient room to bend your knees. When you skate you should feel your shin leaning firmly into the laces across the tongue. You should have a secure feeling if tightened correctly and your boot should begin to show some lacebite (slight grooves in the leather) where the laces lay on the boot and across the tongue. Finish with a secure bow and double knot.
Do NOT put the laces around the hooks then pull on them until tight. This method of lacing may lead to deteriorating the security of the hook in the boot. Laces should be pulled tight left & right before putting them around the hooks. This process should be repeated for those hooks that remain.
Replace laces when they start to wear or to lose threads, or when the plastic ends (aglet) come off.
Always keep spare pairs of laces in your skate bag.
Edea skates are designed to support the foot and not for flex like traditional boots. This innovation means you need to lace the Edea way. Out-in lacing is far superior giving better hold and control than in-out lacing. The difference may seem small but the impact is huge.
OUT ➔ IN (EDEA LACING)
Why:
How:
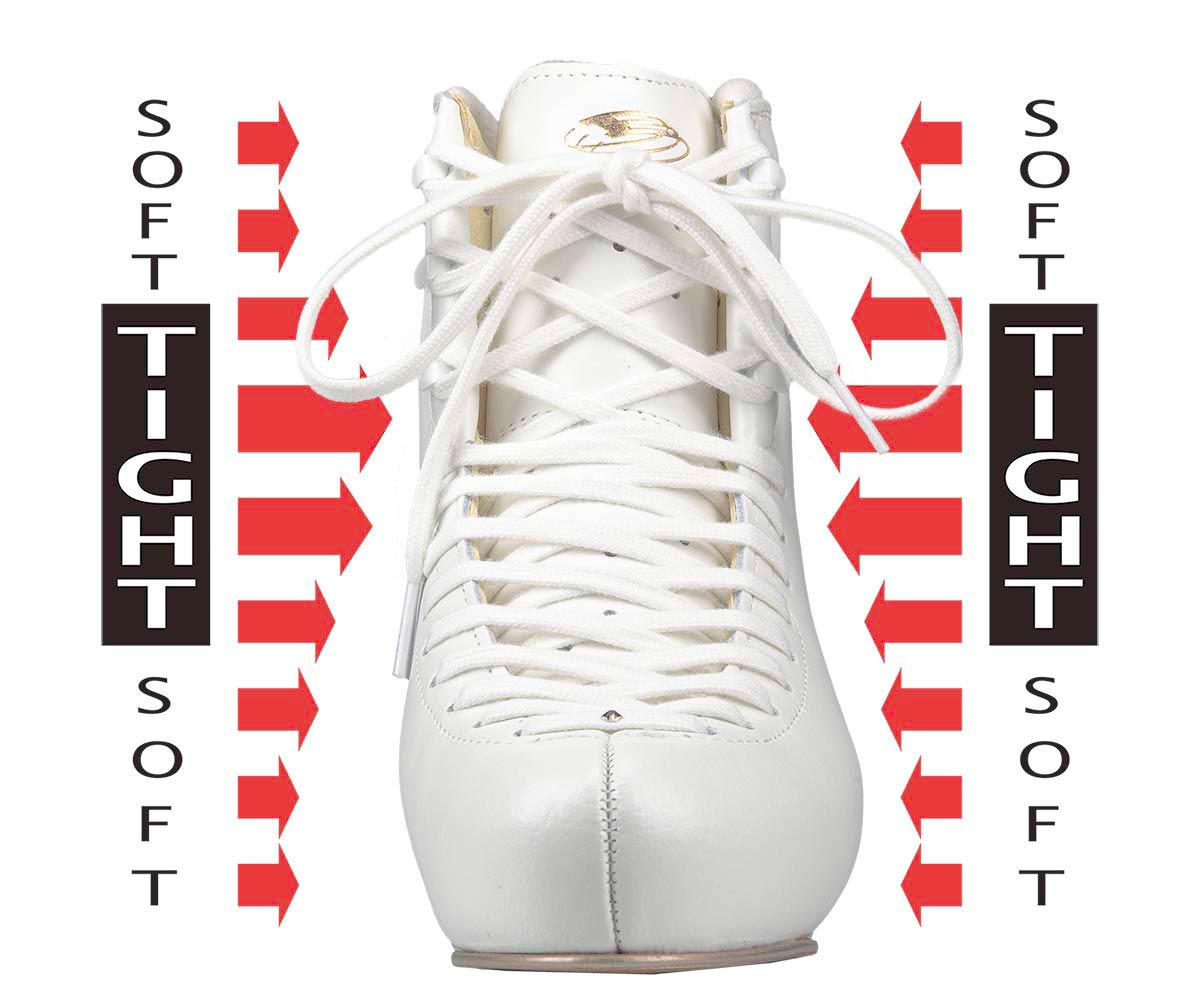
Lacing should keep the heel in its pocket, minimizing movement. To do this, it is important to lace the last eyelets and the first hook more tightly. This creates an “hourglass” lacing effect:
Once laced, check the tension by passing a finger across the lacing intersections. The laces should not move.
Pulling the laces tight enough with your fingers is hard. The lace puller makes it easier, quicker and gives the perfect tightness.

Virtual Fittings
Bringing the Everglides experience straight to your door! Click to book your virtual skate fitting!

Book an Appointment
Use our online booking system book an appointment for one of our services.

Instore Fittings
Alongside our industry experts, our personal fitting service will help you find your perfect pair of skates.